

Hi Crafty Friends,
Welcome to our Karen Burniston Products – KB Riley LLC September Release Blog Hop. The Design Team have come together with Karen today for a fun blog hop to celebrate the release of 9 new dies. Sneak peeks of the new release started last week, and the dies are available to order NOW!

This release includes:
• 2 new Script Sentiment Die Sets
• 3 new Border Die Sets
• 2 new Pop-up Die Sets
• 1 new Add-on Die Sets
• 1 stand alone Die Set
Dies are available to order now on the website.
GIVEAWAY:
To celebrate the release Karen Burniston and each of the Karen Burniston – KB Riley LLC Design Team members will be giving away a $25 Gift Certificate to some lucky person who comments on our blog posts, so make sure you join the hop and comment on everyone’s blog post. Winners will be randomly chosen from ALL of the blog hop comments received on our blog posts by Monday,25th September 2023. Lots of chances to win some goodies, so just leave a comment on this post or any other blog hop posts to enter! Don’t forget to leave some way for us to contact you, in case you are a lucky winner!
This is the order and all the links
Me 😀
This was such a fun card to make, I wanted to use the Oven Pop up in a unique way, so instead of a nice pretty kitchen scene, I went for the kitchen of nightmares. On the plus side I think this is the only card I’ve ever made that used Christmas and Halloween diesets.

All the fun is in the reveal, to see this card in action please check out my FACEBOOK page, feel free to join if you would like to share your own crafty creations. You can also see a video of this card on my INSTAGRAM page.
*I was travelling when I wrote this post, so I found it easier to add all the links at the end instead of through out the post
1A- cut card base as shown, the panels are 5 1/4” square.
B- I used Versa Mark to ink the edges as shown
C- add panels to the card base

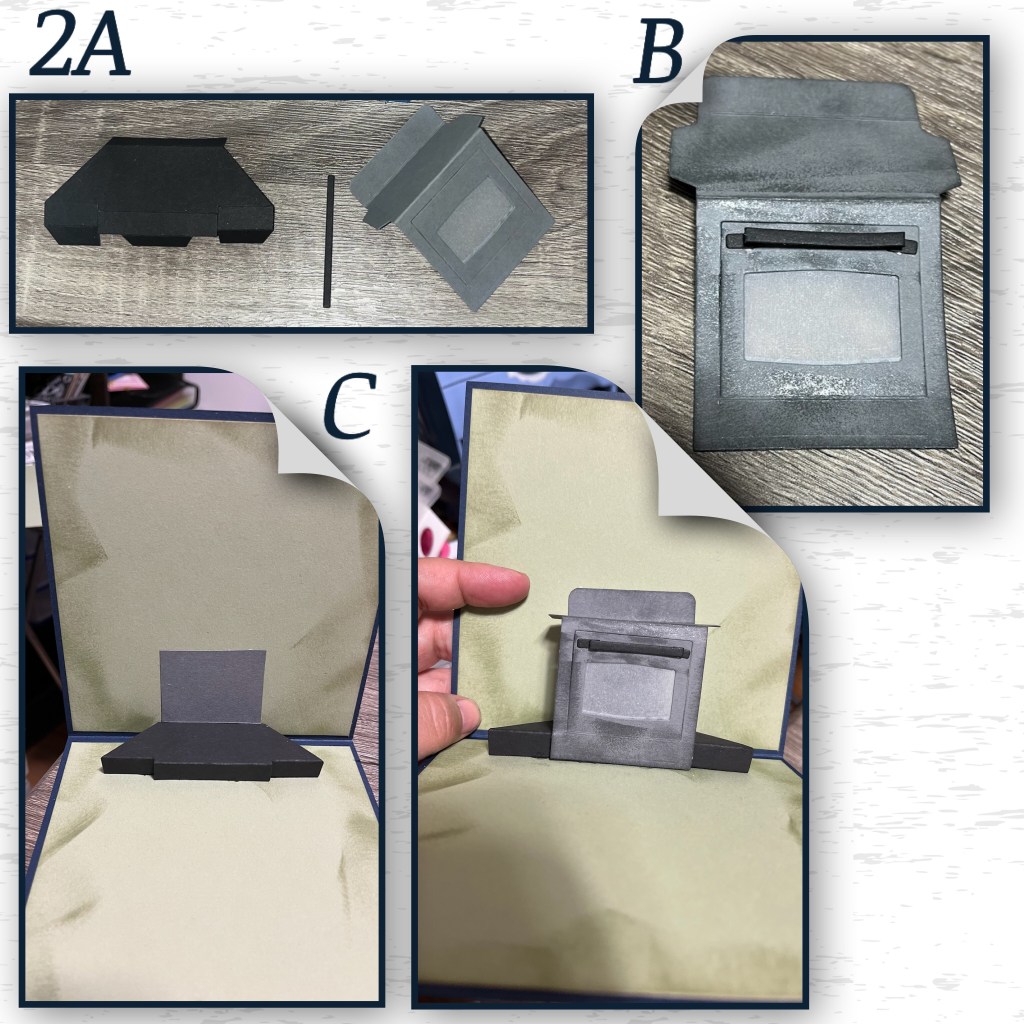
2A- cut out the pieces for the oven, I added velum to the oven door.
B- I added the handle and used Versa Mark ink to make the stove look kind of grungy
C- Add the stove to the card, Karen will have a video soon
3A- I die cut the backsplash from the Oven Extras using a Versa Mark marker I added shading to the right side and bottom of each brick, I added white highlights to the top and left of each brick, then used a fine tip black pen to draw in the grout, and the cracks.
B- I used the same technique on the range hood, except I drew stones instead of bricks.
C- I made the shelves by cutting wood grain paper into strips that are 1/8” by 5 1/4”. I made 3 shelves

4A- I started adding the elements to the card, I decided to hang the cupboard doors slightly askew. I also hid the back of the stove behind the backsplash as I wanted it to look more like a woodstove than an electric stove.
B- The witch hair doubles as fire, I used that for the fire on the back of the oven, I also used the fire from the Fireplace Pop up to add more flames. I added the fireplace flames to a box pop up.

5A- now I’m having fun adding all the elements. I pulled out a lot of diesets, I list them at the bottom.
B- I thought it would add to the creep factor if I had a pair of creepy eyes peaking out from the space in the cupboard. I drew them with a white marker, then used a green and black marker for the details.
C- added some the bones and skulls from the Halloween borders and “Enough to Eat” was diecut using the Mini Alphabet and numbers.

6A- I diecut the pieces for the Holiday House, I started with a gel pen for the icing on the roof and then decided to switch to a white marker.
B- I used the OutdoornScenes for the back ground
C- I added my fully decorated the Ginger Bread Holiday House, I added a tiny tree. The gingerbread men and candy canes are from the Christmas Borders

7- I created Hansel and Gretel using pieces from the Princess & Mermaid set, and the Tiny Gnomes. I used a Versa Mark Marker to add shading, a white gel pen for highlights and a black fine-tip marker for the eyes

8A- I diecut then largest Banner Crosshatch, I added 2 score lines aboutb1/4” in then about 1/8” apart. I die cut another smaller banner from green. I had to trim a bit off the flat end so it would fit as shown.
B- adding adhesive to the small flap, add the banner as show, leaving room to see the gingerbread border

As always, the magnet closure was an after thought
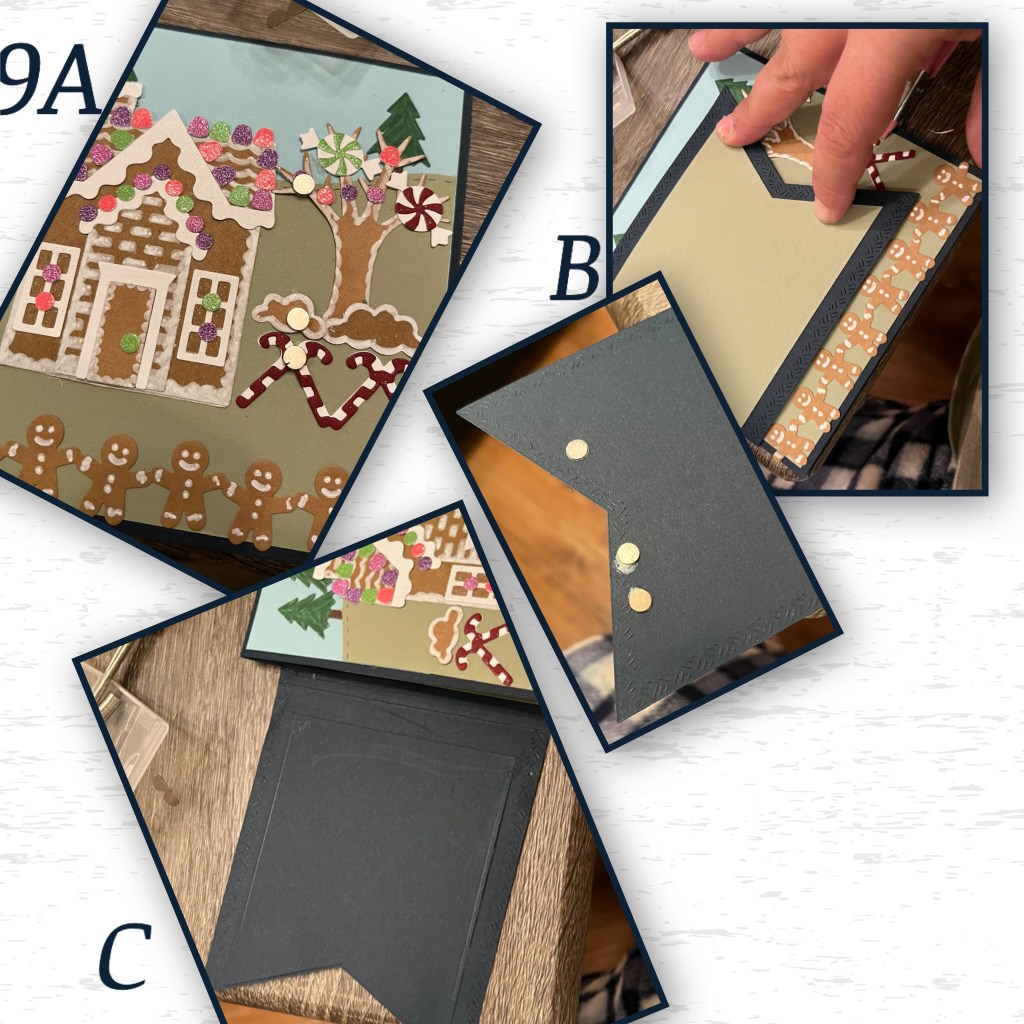
9A- I slipped in some mini magnets behind a tree branch, a bush and a candy cane. Add the other magnet on top of the first, add glue to the top magnet, then close the flap for perfect magnet alignment
B- The magnets on the flap should look like this
C- diecut another banner from the same colour and cover the magnets
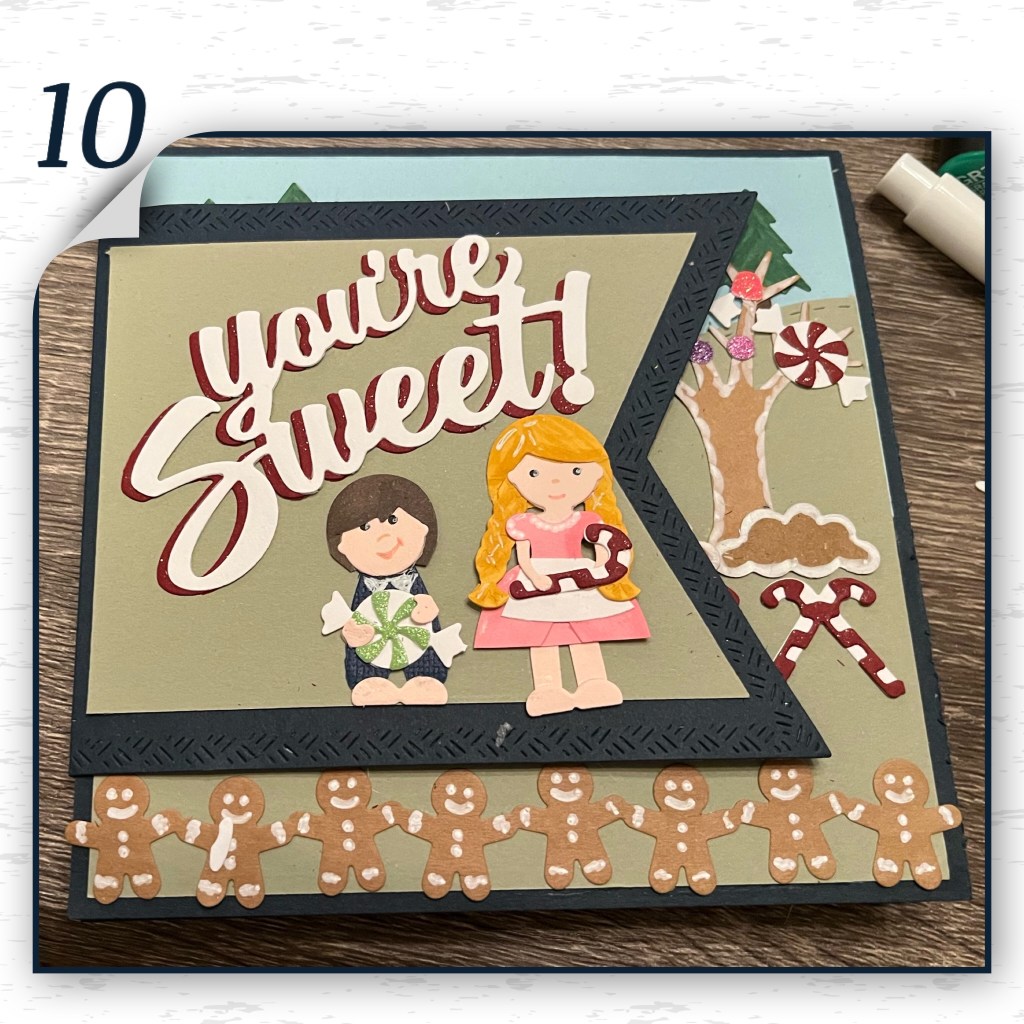
10- I added the “You’re Sweet” and Hansel and Gretel to the front of the flap


Inside of card dies used
Oven & cupboards- Oven Pop Up
Backsplash & hood vent, pots, cutting board, knife, box pop up Oven Extras
Book- Book Worm
Candle- Fireplace Extras 1
Clock & Plant- Fireplace Extras 2
Cat- Skeleton and Cat
Crow- Halloween Elements
Spider & we- Halloween scene
Bones/skulls- Halloween Borders
Witch/ broom/fire- Which and Cauldron
Extra Fire- Fireplace pop up
Bam box Small Scene Bam Box
Skulls & bones border- Halloween Borders
“Enough to eat” Mini Alphabet & Numbers
Outside of card dies used
House Holiday House
Tree Tiny Trees
Bushes- clouds from Castle pop up
Gingerbread decorations- Gingerbread Tiny House Add On
Girl- Princess & Mermaid braids and feet- Tiny Gnomes
Boy-Tiny Gnomes Hair is princess’s hair with a trim
Trees background- Outdoor Scene
Gingerbread border and peppermints- Christmas Borders 1
Candy-cane border – Christmas Borders 2
Other Tools Used
Verse Mark Marker

Awesome card! Love your take on the kitchen. So many amazing details. Appreciate your instructions. vrc at prodigy dot net
LikeLiked by 1 person
WOW. Lot of details. Great card
LikeLiked by 1 person
I absolutely LOVE your witchy kitchen! Such a wonderful imagination! This just might be my favorite!
LikeLiked by 1 person
A brilliant and awesome made card, love this design and the the way you make out of this world projects Nicky x xx Thanks for always adding onto my facebook group x
LikeLiked by 1 person
OMGosh, as always your card creations are over the top! All the extra details you add really make your cards one of a kind. Thank you for always taking the time to explain how you achieved each special effect and which dies you used.
LikeLiked by 1 person
I LOVE the Halloween card. It is so adorable on the outside and unpredictable on the inside. I love pop-up cards too! Your explanation is so helpful!
LikeLiked by 1 person
Very creative card design with the Hansel and Gretel theme.
slrdowney at hotmail dot com
LikeLiked by 1 person
This is awesome! I just love all the details!
LikeLiked by 1 person
Amazing card – love it!! Love the wonderful detail and design – so creative!!! Thank you for sharing the instructions for making this stunning card.
LikeLiked by 1 person
What can I say…just amazing. The details are incredible. The whimsical storybook front and then you get the full story on the inside. Just amazing truly amazing. Great job.
LikeLiked by 1 person
Very fun card! Love the sweet gingerbread house on the front, and the awesome surprise inside! Awesome designs and details!
deniseb777ATgmailDOTcom
LikeLiked by 1 person
Thank you for sharing the fire!
LikeLiked by 1 person
Very eye catching design, love the twist when the card is opened.
mendo.dre @ gmail dot com
LikeLiked by 1 person
WOW! So many awesome details. Love the crooked door (with a creature peaking out), the stone work & even skulls in the oven! WOW!
LikeLiked by 1 person
VERY CLEVER!!!
LikeLiked by 1 person
Wow!!! Amazing card!!! Not one but two reveals! So much detail!!! So very creative!!!
LikeLiked by 1 person
Just love your card! Welcome to the Nightmare before Christmas cardmaking club! (Just kidding!) You are very imaginative! I love your work! Thanks for sharing!
LikeLiked by 1 person
Your cards are always so freaking amazing (and I love your quirky humor!!). I can’t wait to be inspired by your cards yet again! So amazing, please keep creating 😀
Lisa_monken@cox.net
LikeLiked by 1 person
Oh my goodness, what an amazing Hansel & Gretel card! What a talent to come up with such a clever idea! TFS!! I’m lovin’ the oven and think this is a terrific release!
LikeLiked by 1 person
I always love your cards, but I love your Halloween/Hansel and Gretel kitchen. I love the crooked cupboards and all of the little details. So fun!
LikeLiked by 1 person
O My ! I Love all of the extras you added to this wonderful card, it is so much fun. I keep seeing more each time I look at it. I love how you added all the brick work, you are sooo good at it. Thank you for all your hard work and sharing.
LikeLiked by 1 person
At first, I didn’t realize that it was a Halloween card. The outside totally fooled me until I saw the inside!
LikeLiked by 1 person
Amazing amount of details on this one …. so very cute!!!!
LikeLiked by 1 person
Yep, that is one spooky kitchen and one really cute, imaginative card. Another show stopper! Thanks.
LikeLiked by 1 person
THIS IS SOOOO CREATIVE! I LOVE your witch and darling kiddos!
LikeLiked by 1 person
What a great card. Thank you for the extensive list of dies you used to make this card. I was happy that I had most of them You are such a creative card designer.
LikeLiked by 1 person
How imaginative! Wonderful use of all the KB products with a bit of scary surprise. Thanks for sharing your talent.
LikeLiked by 1 person
This is just hysterical when you open the card! HOW FUN!!! All the details you put into this are spooktacular & fun.
rebyah1@gmail.com
LikeLiked by 1 person
Wow! As soon as I saw the kiddo’s I knew we were heading for a Hansel and Gretel theme! Absolutely love it. The kids are sweet and cute, and the kitchen – well…we all know what happens in that kitchen! Cute cute cute!
LikeLiked by 1 person
Oh wow, what a surprise! What an amazing use of all those dies. Hope to see more like this!
LikeLiked by 1 person
Such a surprise inside to this card! I love the numerous dies you used together and since I’m glad I’m a KB collector I have everything I need to make this card myself. Thanks for this creative card! cerbinh@gmail.com
LikeLiked by 1 person
This was a labor of love I could tell. The amount of added detail makes this card outstanding! Thanks for such detailed instructions.
LikeLiked by 1 person
Thank you for Posting the list of Dies you used to make this Incredible card 🙂 Thank goodness I have most of them:) I ordered the new dies and cannot wait to make a Halloween card like this 🙂 Your ideas are so Creative !
LikeLiked by 1 person
Oh WOW, that went in a totally different direction than I expected. I thought such a cute Gingerbread card and was surprised for the halloween inside……great job!!!
LikeLiked by 1 person
OH MY GOODNESS ~~ What a great card. Thank you for the extensive list of dies you used to make this card. I was happy that I had most of them 🙂 You are such a creative card designer.
LikeLiked by 1 person
I dont usually do halloween cards, but this idea just might change my mind. I love total surprise cards. One of my old but not forgotten favorites is when Karen did the paris theme that turned into a halloween card without any warning. I hope to see more of these type cards.
LikeLiked by 1 person
This card is so FAB!!!!!
LikeLiked by 1 person